 |
User Guide
Document number: hc.70 © 2026 1stWorks Corporation. All rights reserved. |
| Contents | First | Back | Next | Last | Printable | 1stWorks Support |
Audio is described in these topics:
VoIP Settings window
Use the VoIP Settings window to adjust settings for audio you present (see Recording Properties) and hear (see Playback Properties). Change settings as you wish, then click Apply, and then click Ok when you're ready to close the window. If the settings don't seem to take effect immediately, exit hotComm, wait 20 seconds, and restart it.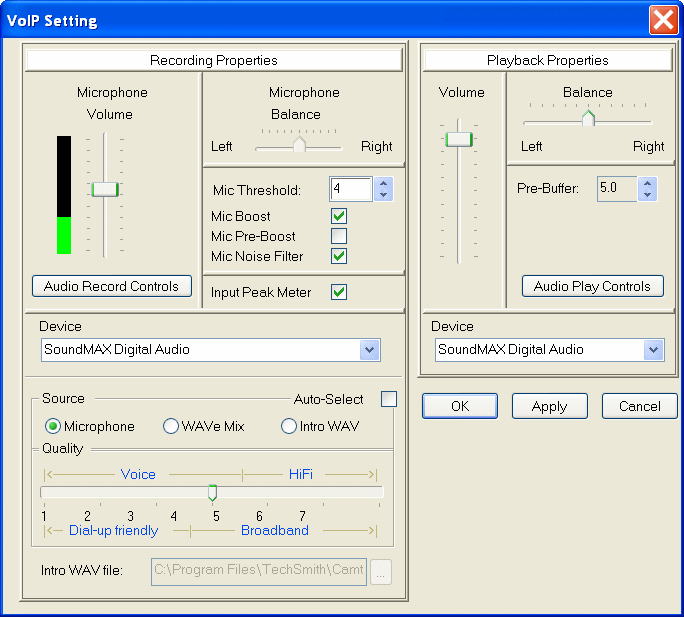
Recording Properties Playback Properties Top
Recording Properties
These settings control the voice and recording audio you present:| Setting | Description | |||||||||||||||
| Volume | To change your output volume, move the slider up for louder, down for softer. | |||||||||||||||
| Audio Record Controls | Use this button to open your Windows Sounds and Audio Devices Properties. When you are setting up hotComm, make sure that the things you plan to use are displayed:
|
|||||||||||||||
| Balance | If your recording device has left and right inputs, you can adjust the balance. Note that this is grayed out for many microphones, because they have only one input channel. | |||||||||||||||
| Mic. Threshold | To change the volume level at which the sound transmission is triggered, select a Threshold level. A lower threshold means that hotComm will start sending audio when it detects quieter sounds than it would with a higher threshold setting.
If the presenter's audio seems to come and go, the presenter might try lowering their threshold level. |
|||||||||||||||
| MIC Boost | If your audio card supports a microphone boost option, you can check the MIC Boost checkbox to enable it. MIC boost enabled may increase volume, but may also cause audio problems for your listeners. Experiment to find the best solution for you. | |||||||||||||||
| MIC Pre-Boost | This option increases your mic output. Use this to improve audio if necessary. Uncheck this if your audio output sounds garbled and bad. Experiment to find the best solution for you. | |||||||||||||||
| Noise Filter | To filter out background sounds and other unnecessary noise, check this option. | |||||||||||||||
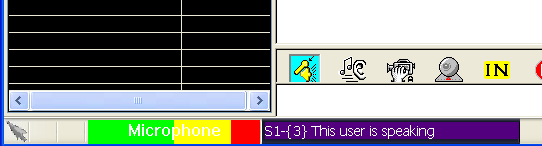
| Input Peak Meter | Display a colored input meter when your mic is on. You can use this to confirm that hotComm is receiving audio through your mic. The Input Peak Meter appears on the bottom line of your hotComm window, and looks like this:
|
|||||||||||||||
| Device | ||||||||||||||||
| Device | Select which input device you want to use as a microphone. If your computer is set up for multiple input devices (such as a USB mic and a sound card), you can select which one to use.
hotComm attempts to use the device defined as your Windows system default. As a general rule, use the same device defined to Windows. To see which device is defined to Windows:
|
|||||||||||||||
| Source | ||||||||||||||||
| Source | Select an audio source
Note:
|
|||||||||||||||
| Auto-Select | While your hotComm mic is on, your Source selection becomes your default Windows input device. This affects all applications that are running.
When you turn your hotComm mic off:
|
|||||||||||||||
| Quality | ||||||||||||||||
| Quality | Select an audio compression level, to control the clarity and resolution of the sound itself. Level 1 has the lowest compression, and therefore the lowest quality. Choose the highest level that provides good audio for your listeners.
Although any level can be used for voice or recordings, the following are recommended:
Note on Quality:
|
|||||||||||||||
Recording Properties Playback Properties Top
Playback Properties
These settings control what you hear:| Setting | Description |
| Volume | To change your playback volume, move the slider up for louder, down for softer. |
| Balance | Move the slider on the Left-Right horizontal scale until the sound is balanced correctly between your left and right speakers. |
| Pre-Buffer | This setting controls how many sound packets are grouped together before they are played. If parts of words or phrases are being cut off, or the sound seems choppy, increase the pre-buffer setting.
There is no rule about what setting will be right for you. You may need to change the Pre-Buffer setting for different situations. The best setting is the lowest one that still gives you smooth, uninterrupted sound. |
| Audio Play Controls | Use this button to open your Windows Volume Control.
When you are setting up hotComm, set the microphone to mute, to avoid echoing:
|
| Device | |
| Device | Select which device you want to use for playing back audio. If your computer is set up for multiple playback devices, you can select which one to use.
hotComm attempts to use the device defined as your Windows system default. As a general rule, use the same device defined to Windows. To see which device is defined to Windows:
|
Recording Properties Playback Properties Top
| Contents | First | Back | Next | Last | Printable | 1stWorks Support |
|
© 2026 1stWorks Corporation. All rights reserved. See our terms of use. All trademarks and registered trademarks are the property of their respective owners. |