To configure a WMV format recording:
- Right-click the R-in-a-circle icon or select Session Recording Setup from the Session menu. This opens the Session Recording Setup window.
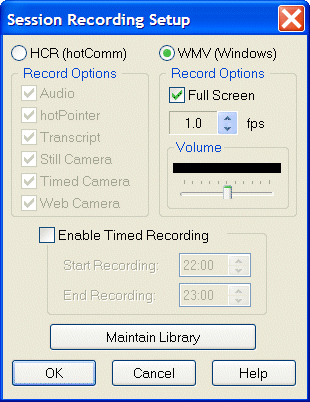
- To select WMV format, click the WMV (Windows) circle.
- Choose Full Screen or just the hotCam windows.
| Option |
Description |
| Full Screen |
To record Full Screen, check the Full Screen box. If this box is checked, the recording captures the full screen of your primary monitor.
|
| hotCam windows |
To record the hotCam windows (where charts and graphics are displayed), un-check the Full Screen box. If this box is un-checked, the recording captures any hotCam windows that appear on your primary monitor.
|
|
Note: Make sure that everything you want to record is visible on your primary monitor. The recording will not capture minimized windows or windows that display on other monitors.
|
- Set the WMV fps option, which is the frames per second. This is set by default at 1.0 fps.
- Click OK.
WMV format Volume slider
The WMV format Volume slider allows you to view the volume of the speaker as it is being picked up by the recorder. This can be helpful because the audio is being recorded by Microsoft Encoder, which uses different audio codecs than hotComm does, so the recorded volume level may be different that what you are hearing directly through hotComm.
Timed Recording
You can set the recording to start and end at specified times.
- Check Enable Timed Recording.
-
Use the timer arrows to set Start and End times.
Note:
- You can set one time period.
- The time is taken from your computer's time settings.
- The recording timer is automatically reset at midnight, so the time period must be within a 24-hour period running from midnight to midnight, based on your computer's time settings.
- You can not set the timer for a future date. However, if you leave Enable Timed Recording checked, another recording will be made at the same time every day.
If Enable Timed Recording is set, you can also make other recordings at any time by clicking the Record button. Note that if your other recording overlaps the End Time for a timed recording, the recording will stop according to the End Time setting.
Maintain Library
Click Maintain Library to open the T'SCRIPTS folder, where the recording files are saved. This view shows all files in the T'SCRIPTS folder, not just recording files.
Record Yourself with WMV
If your sound card has a stereo mixer option, in most cases, you can record your own presentation, provided you follow these steps:
- Join the room.
- Get your content ready, and select your recording format.
- Turn on the camera and start presenting the visuals.
- Start the recording. Wait 10-15 seconds until it is firmly established. While it is starting up, your screen (or the edge of the area you're recording) will blink. When the blinking has stopped, then the recording is firmly established.
- Then turn on the mic and start talking.
Troubleshooting
Note that your computer must have adequate resources to record with the Microsoft Windows Media Encoder as well as to run your presention.
Note that some common sound cards, such as Sigmatel Audio, do not have a stereo mixer option, and therefore you cannot record yourself on computers with those cards..
RealTek Audio on Vista
5/20/08 - Here is a solution for anyone having problems recording WMV audio under hotComm on a Windows Vista machine which has the RealTek High Definition Audio device. The basic problem is that the driver for Realtek Audio that Microsoft includes with Vista does not work; you need a real RealTek Audio driver.
You can download RealTek High Definition Audio Drivers from various sources on the Internet. We have placed a copy of the RealTek High Definition Audio Driver for Vista on the hotComm website at http://www.hotcomm.com/ftppub/RealTek-Vista/VISTA_R165.ZIP.
Here are some notes about installing the driver:
| 1. |
When installing this driver the user needs to manually uninstall the existing High Definition driver from the Device Manager, then, before rebooting, needs to run the SETUP.EXE located in the ZIP file (after expanding the ZIP file to their hard disk) and install the RealTek driver. Letting the system decide upon reboot simply installs the driver that comes with Vista (which doesnt work).
|
| 2. |
Once installed and rebooted, bringing up the Recording Controls will show the Stereo Mix option in a disabled state. The user simply enables it (right-click and select ENABLE) and sets it as default. This should be all there is to do.
|
| 3. |
To test, leave the hotComm Recording Controls displayed and start the Media Player and play something. At this point the user should see the peak bar to the right of the Stereo Mix option display green bars, indicating that the system is receiving wave input.
|
Top
|