 |
User Guide
Document number: hc.70 © 2026 1stWorks Corporation. All rights reserved. |
| Contents | First | Back | Next | Last | Printable | 1stWorks Support |
Operation Mode
Applies to: hotComm Standard/Pro| Use Operation Mode to configure your hotComm session or room, and to change your Nickname/Identity/Name.
To open the Operation Mode window, select Options, then Mode/Identity Setup. After you change settings, click OK to save. Operation Mode is described in these topics: Mode Selection and Name Change Auto Options Set Room Password Reset Server's Block List Manage Moderator List Set Minimum Version Remote Control Password Call Group AE Messages |
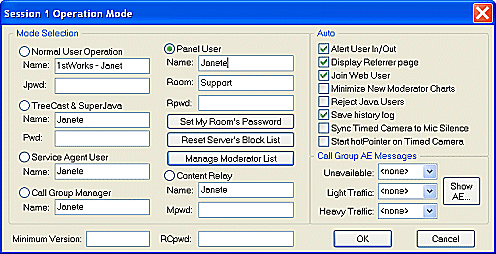
Mode Selection and Name Change
Select a mode for your hotComm sessions and change your name.
To change your name as it appears in rooms and sessions, enter the name you want to use under the operations mode that is checked. If you switch between modes, you can choose different names for each mode, or use the same name for all modes.
| Mode | Description |
|---|---|
| Normal User Operation | Requires hotComm Standard (or higher).
Use to join rooms or participate in peer-to-peer sessions. In a peer-to-peer session, one incoming caller can connect in each session. In addition, you can invite multiple hotComm Standard/Pro guests. Name: Enter any name. Jpwd: To password protect the session, enter a password. Callers are prompted for the password when they try to connect. |
| Panel User |
Requires: hotComm Presenter Pro (or higher)
Use to moderate rooms. A Panel User can open a moderated room in Session 1, and can manage the room. You must be authorized as a Panel User. The behavior of Session 2+ is similar to Normal User Mode. Name: Enter a name for the Panel User. Room: Enter a room name. Also see:
|
| TreeCast & SuperJava |
Requires hotComm Presenter Pro Plus.
You are hosting hotComm as a room on your computer. Multiple incoming callers can join your Session 1, including hotComm Lite, hotComm CL and hotComm Java. In addition, you can invite multiple hotComm Standard/Pro guests to your Session 1. The behavior of Session 2+ is similar to Normal User Mode. Name: Enter any name Pwd: To password protect Session 1, enter a password in the Pwd: field. Callers are prompted for the password when they try to connect. Note: Currently, this product is not supported without special arrangement. If you are interested, please contact hotComm Sales. |
| Service Agent User | Requires: hotComm Standard (or higher).
Your Session 1 contains a copy of the Call Manager queue. When you accept a call from the queue, it opens in a new session window (Session 2+). The behavior of Session 2+ is similar to Normal User Mode. Name: Enter any name. See: hotComm Call Manager.Note: Currently, this product is not supported without special arrangement. If you are interested, please contact hotComm Sales. |
| Call Group Manager |
Requires: Call Group Manager
Content Relay is a hotComm server. Session 1 contains a queue of incoming connections, from callers who click on the Call Manager link. Service Agent Users also see the queue, and can select calls from it. The behavior of Session 2+ is similar to Normal User Mode. Name: Enter any name. See hotComm Call Manager. Note: Currently, this product is not supported without special arrangement. If you are interested, please contact hotComm Sales. |
| Content Relay | Requires: Content Relay.
Content Relay is a hotComm server that hosts multiple rooms. Name: Enter a name for the Content Relay. Mpwd: To password protect the server, enter a password. See Content Relay. |
Auto Options
Select automatic options:
-
Alert Joining User
To sound an alert when a User joins your session, check the Alert Joining User box.
Note: this option applies to TreeCast Moderator, Call Group Manager, Service Agent, and Panel User (logged into Content Relay Manager).
See Sound Events.
-
Display Referrer page
When a caller connects, hotComm can display the page containing the button or link they clicked.
To display the page, check Display Referrer page.
-
Join Web User
In TreeCast Moderator mode, you can choose to automatically accept any IM-Live or hotComm Lite caller into Session 1. This saves you from accepting each caller individually. To allow callers to join automatically, check the Join Web User box.
Summary by mode:
Mode Option Comments TreeCast Moderator Applies TreeCast Moderators can select and de-select this option. Panel User Does not apply In Panel User mode, callers are always joined automatically into Session 1 if the Panel User is logged into a Content Relay Manager. If the Panel User is not logged in, then callers are not automatically joined. All other modes Does not apply Callers are not automatically joined.
-
Reject Java users
Disallow connections by people using hotComm Java.
-
Save history log
To automatically save transcripts, check the Save history log box.
Note: this option applies to TreeCast Moderator and Panel User (logged into Content Relay Manager).
-
Sync Timed Camera to Mic Silence
To stop the hotCam Timed Camera when people are talking, check the Sync Timed Camera to Mic Silence box. The Timed Camera continues to send updates when all microphones are off or all speakers are silent.
-
Start hotPointer on Timed Camera
Automatically start the hotPointer whenever you start a Timed Camera.
Set Room Password
You can set the Room password(s) if you log in from the hotComm registration that the room is based on), as a Panelist, in Session 1, with any of the passwords. Or, you can change it if you are a listed moderator, logging in as a Panelist in Session 1, with the CL Moderator password.In Rpwd, enter the password(s) for the room and click Set My Room's Password.
If hotComm CL users are joining your room, enter passwords for users, moderators, and presenters. (The password the hotComm CL user gives determines whether they join as user, presenter or moderator.)
In Ppwd, enter the CL Presenter password.
In Mpwd, enter the CL Moderator password.
Then click Set My Room's Password, and wait for the server acknowledgement before you click OK.
Note: if the password you see is blank, it will be set as a blank (no password). If the password you see has dots or asterisks hiding the actual password, it will not be changed when you click "Set My Room's Password".
edited 11/18/09
Reset Server's Block List
With hotComm Standard/Pro, you can unblock the server block list (users who have been blocked by room moderators), if you log in from the hotComm registration that the room is based on), as a Panelist, in Session 1, with any of the passwords. Or, you can change it if you are a listed moderator, logging in as a Panelist in Session 1, with the CL Moderator password.Click Reset Server's Block List
Note: the server lock list includes users blocked by any moderator on the server. Clearing the block list clears all of them.
edited 11/28/09
Manage Moderator List
With hotComm Standard/Pro, you can manage the moderator list for your room if you log in from the hotComm registration that the room is based on), as a Panelist, in Session 1, with any of the passwords. Or, you can manage it if you are a listed moderator, logging in as a Panelist in Session 1, with the CL Moderator password.This lets you add or delete listed mdoerators. These people can open your room and manage sessions in your room, as well as use the moderators presentation capabilities.
Note: this applies to moderators using hotComm Standard/Pro (or higher). Do not attempt to add hotComm CL moderators. Instead, ask them to log in with the room's CL moderator password.Click Manage Moderator List.
In the Moderator List window, click Add to add a moderator. Or, highlight an existing moderator and click Delete to remove them from the list, or edit their entry and click Update.
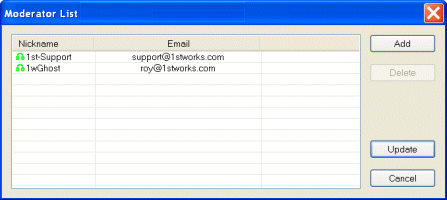
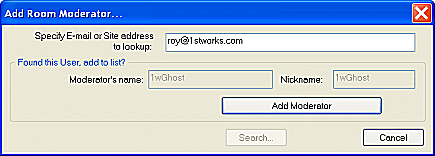
When adding a moderator, enter the person's hotComm email address and click Search. When they are found, click Add Moderator.
edited 11/28/09
Set Minimum Version
You can set the minimum version of hotComm required for your room if you are in Panel User mode, and you are logged into a room with the Room Account (the hotComm account that the room is based on).In Minimum Version, enter the number of the minimum version of hotComm that you will allow users to connect with. Users who attempt to connect with a lower version number receive a notice that they must update their hotComm software.
For example, enter 3.60.001 to require that as the minimum version.
Remote Control Password
Enter a password for remote control access to your hotComm. This applies to any Operations Mode.Call Group AE Messages
As Call Group Manager, you can select the messages that display to callers in the Call Queue waiting window. The messages are stored as Abbreviation Expansions (AE). To see or edit your list of abbreviations, click Show AE ....
| Situation | Use this abbreviation when ... |
|---|---|
| Unavailable | No Service Agent Users are logged in and the Call Group Manager status is busy (one of the DND options). |
| Light Traffic | More Service Agent Users are available than there are calls in the queue. The caller should expect a fairly quick response. |
| Heavy Traffic | There are more calls in the queue than available Service Agent Users. The caller should expect to wait. |
See: Abbreviations.
| Contents | First | Back | Next | Last | Printable | 1stWorks Support |
|
© 2026 1stWorks Corporation. All rights reserved. See our terms of use. All trademarks and registered trademarks are the property of their respective owners. |