
Troubleshooting FAQ: Microphone
|
Document Number: FAQ: AM-01
Copyright (c) 2001-2026 1stWorks Corporation. All rights reserved. |
Questions:
- My microphone just stopped working.
- My microphone doesn't work.
- Microphone settings.
- General Audio Problems.
- Multiple Mics.
My microphone just stopped working.
If your microphone seems to work and then stop working during a hotComm session:-
Turn the mic off and then on again.
- If it continues to not work, close hotComm, wait 20 seconds, then restart hotComm.
- If it continues to not work, restart your computer.
My microphone doesn't work.
hotComm VoIP Settings DirectX Upgrade DirectX DirectPlay Voice TestWindows Mic Test Upgrade drivers Hardware Accellerator Truespeech
If your microphone doesn't seem to work:
- Make sure that you have a microphone, and that it is plugged into your computer correctly, according to the directions that came with your computer or microphone.
Microphone requirements:- Noise-cancelling required.
- Headset preferred (or people will hear the sound coming from your speakers when you talk).
- Microphone must be plugged into your computer (not a webcam mic).
Note that some computers include built-in microphones. - hotComm VoIP Settings
-
Right-click the hotComm Mic icon
 , which opens the VoIP Settings window.
- On the left, under Recording Properties, click the down arrow at the far right of the Device Box to list available devices. Likely is is set to System Default. Simply try something else that might make sense, like USB headset (if you have one), Speakers, etc. Hit Apply, although you might have to exit hotComm and restart and re-connect for this to take effect. You can't hurt anything, just play around.
(If you don't know which is the right device, click the Audio Playback Controls button. In Windows Vista, the Sounds Properties window lists devices, and the device usually has a green circle with a white checkmark. In Windows XP, in the Volume Control window, click Options, then Properties, and the correct device is usually the one shown for Mixer Device at the top of the Properties window.) - Click Apply, then OK.
In some cases, you may need to restart your hotComm client, or in VERY RARE circumstances, restart your computer.
-
Right-click the hotComm Mic icon
- Windows Mic Test
Test your sound and microphone through Windows. This usually identifies problems with your sound and microphone hardware. Please correct any problems before continuing.
- Open Windows Start menu, then select Control Panel, then select Sounds and Audio Devices.
- In Sounds and Audio Device Properties, select the Voice tab.
- Click the Test Hardware button.
- Go through the steps in the Sound Hardware Test Wizard as prompted.
- DirectX
Check your DirectX revision, ugrade to DirectX 9.0 if necessary, and run the DirectX DirectPlay Voice Options test.
To check your DirectX revision:
- Close any running applications (recommended but optional).
- Click your Windows Start button.
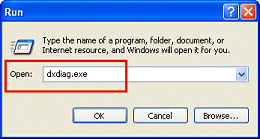
- Select Run.
- In the Open (or Command) box, type: dxdiag.exe
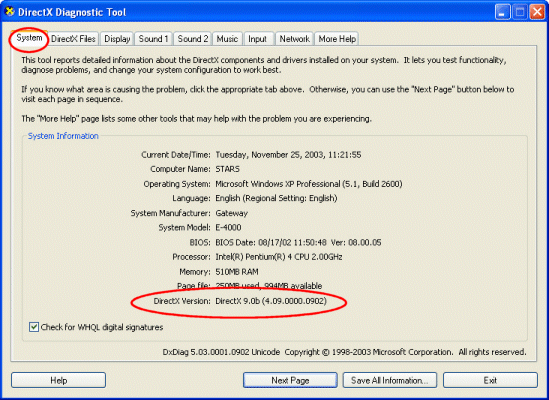
- Look for the revision number. Revision 8.1 is required. Revision 9.0 is preferred, because it contains microphone tests as well as audio tests.
- Upgrade DirectX to 9.0
To upgrade DirectX, Go to http://www.microsoft.com/windows/directx/downloads/default.asp.
- DirectX DirectPlay Test
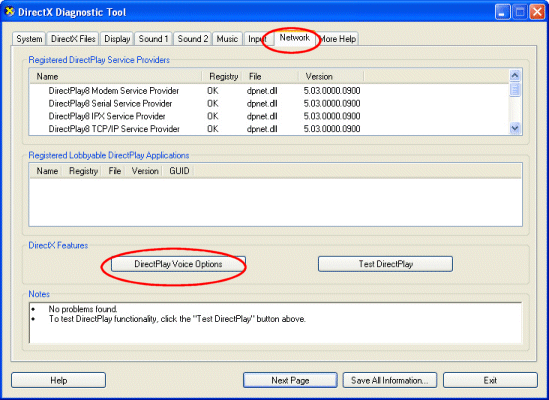
To test with DirectPlay Voice Options:- Run dxdiag.exe as above.
- Select the DirectX Network tab.
- Click DirectPlay Voice Options.
- Go through the steps in the DirectPlay Voice Wizard.
- Make any corrections you need as a result of those tests.
- Sound card drivers
Update your sound card drivers. Check with your sound card vendor.
Often, updated drivers for your sound card can be found through Microsoft Windows Update, at windowsupdate.microsoft.com. Look specifically for updates for drivers. - Hardware accellerator
Reduce your hardware accelleration.
- Open Control Panel
- Open the Sounds folder
- Select the Audio tab
- In Sound Playback, click the Advanced button.
- Select the Performance tab. Move the Hardware accelerator slider down to the first mark after None. Click Apply.
- Turn your microphone off and on again.
- Truespeech codec
If your microphone still doesn't work and you are using a non-XP version of Windows, check for the Truespeech codec. See Truespeech in the “I can't hear anyone” aricle.
Microphone Settings
Voice-over-IP sound quality depends on many things, including the quality of your Internet connection. Sound quality for one person may be better than for another.Before adjusting microphone quality through hotComm, make sure that you are happy with the results of the Windows Sound tests and the DirectX tests described above. Make any necessary corrections, and then continue.
- hotComm Controls
To adjust microphone quality through hotcomm:- Right-click the microphone icon.
- Change settings in VoIP Setting as described below.
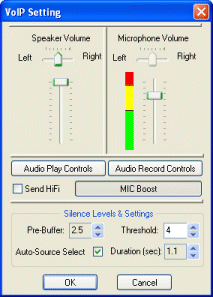
- Microphone Balance
With your cursor, move the arrow on the Left-Right horizontal scale until the sound is balanced correctly between your left and right microphones.
Note: if you have only one microphone, the arrow stays in the center and does not move. - Microphone Volume
With your cursor, move the arrow on the vertical scale up for louder or down for softer. The bar on the left shows the effective current volume. - Boost
If your sound card supports microphone boost, you can increase your microphone's power by clicking the Boost button. The label on the button may vary according to your sound card. If having the Boost on causes audio problems for your listeners, turn it off. - Threshold
To change the level at which the sound transmission is triggered, select a Threshold level. A higher threshold level number means that the sound is transmitted more frequently. - Duration
To set the number of seconds that silence persists before recording stops, click the Duration arrows. After you have been silent for a certain amount of time, hotComm stops sending packets until you make sounds again. This reduces the amount of traffic.
If people hear you even when you are not speaking, lower the hotComm Silence Detection levels. (For example, if your Threshold is 4 and Duration is 1.1, try setting Threshold to 3 and Duration to 0.8.) - Auto-Source Select
When Auto-Source is selected, hotComm automatically selects Microphone in your Windows Sounds and Audio Properties Recording Control whenever you click your hotComm microphone on.
When Auto-Mic is not selected, hotComm does not change your Audio Properties Control setting.
This setting is ignored if Send HiFi is selected. - Send HiFi
To send high quality sound (ex: for voice or music), check the Send HiFi box. If this causes problems for those who are listening, uncheck it. See Audio: HiFi.
General Audio Problems
These are some general audio problems. They may affect the listener or speaker.- Echo
If you experience an echo during your session, set your Audio Play Controls mic to Mute.- Click the hotComm Audio Play Controls button.
- If Mic does not appear in the Volume Control panel, slect Options, then Properties, check Mic and click OK.
- In the Mic column, check Mute.
- Hum
If you experience a hum or other problems with sound quality during a session, turn off the microphone Boost. - Choppy sound, parts of words cut off

If your Mic button changes to show a red X and a yellow background, then the voice quality may be choppy.
If your sound quality is consistently choppy, try lowering the hotComm Silence Detection levels.
Sound may become choppy when there isn't enough bandwidth to handle everything that is being sent. When the button changes back to the blue background, voice quality should return to normal.
Multiple Mics
You can have multiple mics turned on at the same time. The first person to turn on their mic is the Vhost, and audio is mixed on their computer.Please note: you must use a headset. A USB headset is recommended.
Echoing (Windows XP)
If you and the group experience echoing when you turn on your mic or speak, make sure that all audio recording controls are enabled and that for playback, microphone, stereo mix and wave out mix are muted:
- Right-click the hotComm mic icon. This opens the VoIP Settings window. Click the Audio Record Controls button.
-
In the Recording Controls window, click Options, then Properties.
-
In the Properties window, check all the items under "Show the following volume controls". This should include a list of items available to your sound card such as microphone, stereo wave mix, wave out, etc.
-
Click OK and then close the Recording Controls window.
-
In the VoIP Settings window, click the Audio Play Controls button.
- In the Volume Control window, check Mute for Microphone and any stereo mix or wave out items.
-
Close the Volume Control window.
-
In the VoIP Settings window, click Apply and OK.
Top